VFE Resources

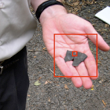
A classic science education film is Charles and Ray Eames’s Powers of Ten. The film begins by joining a picnic at a Chicago waterfront park “with a scene just one meter wide, which we view from just one meter away.” Each ten seconds, the camera pulls ten times further away. It is, "A film dealing with the relative size of things in the universe and the effect of adding another zero." Viewers are moved to the edge of the known universe and then rapidly brought back to the couple’s picnic. The process is carried on to the subatomic level.
Included on this site are three Google Earth tours that re-center Eames’s concept in new locations. They are intended to serve as models for creating your own such interactive video (showing from a centimeter to 10,000 kilometers), centered upon your school or another local landmark. There is also a video tutorial that steps you through how to create your Google Earth Tour.
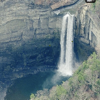
One example video centers on the Science Playground at the New York Hall of Science, the second is centered on the pedestrian bridge below Taughannock Falls in Ithaca, New York, and the third is centered on Windermere Boulevard Elementary School in Amherst, NY. This final tour also includes the video tutorials embedded in a placemark, allowing users to work primarily within a single piece of software.
See the film and learn more about the Charles and Ray Eames here: http://www.eamesoffice.com/the-work/powers-of-ten/
Also see a fascinating interactive animation of the scale of the universe made by Cary and Michael Huang, a pair of 14 year old twins. Note that you can click on each element for a description in this second version.
See the series of video tutorials with accompanying text here.
Resources for Making your Own Powers of Ten
On this page:
-
•Background
-
•Why Make Your Own Powers of Ten?
-
•Selected Images
-
•Link to video tutorials. May, 2015: Download a Google Earth file with embedded tutorials here.
-
•The Powers of Ten FAQ (below)
Powers of Ten Video Tutorials
Downloads:
Elsewhere on the Site
-
•Note: Google Earth has been further updated since these tutorials were last improved. IMPROVED 2015 Video tutorials for creating your own Powers of Ten embedded in Google Earth
Selected Images

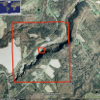
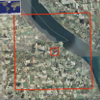
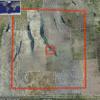
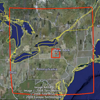
Your Own Powers of Ten Introduction
Why Make a Local Version of Powers of Ten?
There are at least three goals targeted by a lesson using your own powers of ten video:
-
1.Make maps more concrete for your students. Maps are abstractions and abstractions are often difficult for people of all ages to understand. Give your students an unlabeled map of the United States and ask them to put a star at the location of your city or town and to label as many states as the can. You may be surprised to find how many students can’t identify where they live or even their home state. By beginning with the very local – something in the schoolyard – and gradually pulling back, students can hopefully sense what a map actually means. A mapping pre-assessment asking students to do the above is available here (filename: MappingPreassessment.doc)
-
2.Extend student understanding of scale. Most people have only weak understandings of scale – of the difference between one thousand, one million, and one billion, for example. These Google Earth tours are one more tool for helping visualize scale. A weak understanding of scale hobbles a broad understanding of science.
-
3.Highlight a key big idea. To Understand (Deep) Time and the Scale of Space, Models and Maps are Necessary. This is a fundamental Big Idea in Earth Systems Science. (See our five Big Ideas here). If someone does not understand the basics of scale and mapping, they do not hold a deep understanding of the Earth system.
Make Your Own Powers of Ten Tutorial Videos:
The tutorial videos are linked from the “How tos” section of virtualfieldwork.org and available here.
HAS SOMETHING GOT YOU STUCK?
-
•We’re developing an FAQ. In order to do that, we need you to ask questions!
-
•Send an email to Don or Skype him at dugganhaas.
Here’s our first (there are now a few more questions and answers at the bottom of the page):
-
Q: The option I want to choose in Google Earth is grayed out. For example, I can’t add a folder. What do I do?
-
A: A window or floating toolbar is a likely culprit. If you’ve recently played a tour, the control bar window may be open in the lower left, and it might be hidden until you move your cursor into the Google Earth window. Close the controller by clicking on the X. This problem also happens when windows are minimized instead of closed.
FAQ for Powers of Ten Tutorial:
Do you have a question that’s not addressed in the FAQ? Ask Don.
Q1: How do I get pictures from Picasa into my Powers of Ten?
A: First, it’s important to realize that Picasa is two different things (both from Google). The Picasa application is a piece of free software for working with pictures on your computer. You can learn more about it and download it here.
On a PC, you need the Picasa application to work with the other thing that’s called Picasa -- Picasa Web Albums. On a Mac, you can get by without it, but it can still come in handy.
Picasa Web Albums are like Flickr or Photobucket or any of a number of other photo sharing web sites. It’s simply a place where photos get posted online. If you’re already using a photo sharing site, you don’t need to use Picasa, but the tutorials are written using that platform, so it may be easier. Picasa Web Albums, like Flickr or Photobucket, offers a lot of online storage free, and charges a small amount if you have lots of pictures you want to put online.
Now to answer the question. To get pictures from Picasa to Google Earth, there are two ways to go about it, and each has its advantages. You can plug directly into Google Earth or plug into Google Maps and then download the Google Map into Google Earth.
Plugging directly into Google Earth is quicker, but going through Google Maps allows two other advantages -- you can share it with friends and colleagues easily, and allow those folks to collaborate on that Google Map, and you can easily format text in the placemark’s description (what appears in the word balloon).
Both approaches start the same way. In the Picasa application, identify the picture or picture you want to upload, and click the upload button in the bottom of the Picasa window. Once it’s uploaded, click “View Online.”
Here’s where things look different.
To put the picture directly into Google Earth, click on “Link to this photo” (in blue text, to the right of your picture). Copy the code in the box under “Embed image” and switch to Google Earth. Open the placemark that you wish to add the picture to (by selecting “Properties” (on a PC) or “Get Info” (on a Mac) from the “Edit” menu) and paste the text you copied into the description. Click ‘Ok,’ and the picture should be in your placemark.
To use Google Maps as a step toward going to Google Earth, you can follow what’s done in the Tutorial segments 1.02 and 1.03. This is also discussed below in Q4.
Q2: The option I want to choose in Google Earth is grayed out. For example, I can’t add a folder. What do I do?
A: A window or floating toolbar is a likely culprit. If you’ve recently played a tour, the control bar window may be open in the lower left, and it might be hidden until you move your cursor into the Google Earth window. Close the controller by clicking on the X. This problem also happens when windows are minimized instead of closed. For example, you may have selected “properties” (for the PC) or “Get Info” (for the Mac) for a placemark, overlay, path, polygon, or folder and minimized rather than closed it. You won’t be able to edit anything other than that particular element until that minimized window is closed.
Q3: I’m attempting to draw the boxes, but the drawing tool disappears or doesn’t show up in the first place.
A: In order to work with a polygon, placemark, overlay, path, or folder, the “properties” (for the PC) or “Get Info” (for the Mac) window must be open. It can be minimized, but remember to close the window when done working on the object, or you won’t be able to work with any other elements. This is a similar problem to the one above.
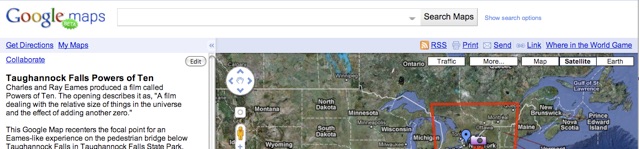
Q4: I don't see an edit link to add photos to the placemark. I am in Google Maps. It seems like a tool bar is missing, or part of it.
A: Two things need to be there for it to work -- first is you need to be in edit mode for the map. I'm guessing you are, but if not, there should be an 'edit' button to click in the top of the left window. That assumes you've opened a map you're working on.
If you're in edit mode, click on the placemark to open up it's balloon. When you do that, it should look something like this:

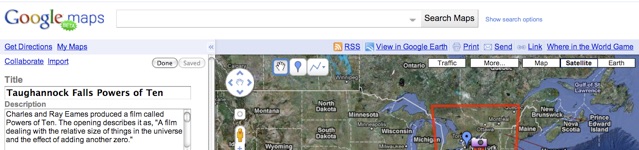
Click on the "Rich text' link inside the balloon and then it should look like this:

Then you can click on the picture icon to insert the image.
Q5: Upon seeing the GPS Visualizer great circle tool, I decided I like this better than squares because every point on the circle is X distance but that is not true with the squares. If a student wants to know how far 10 km is from the starting point, the square is only accurate in the 4 cardinal directions, but the circle is accurate in all directions. I think the circle is aesthetically more pleasing too and it's certainly easier. The only advantage I can see to making squares is you can include local pictures of a person/object/hand/rock/bug. But that can still be done for 1 meter and less.
A: It's fine with me if you prefer circles, as you've identified some good advantage to that. There are advantages to squares too, so which to do depends somewhat on your goals. Both the range rings and the squares have their purposes.
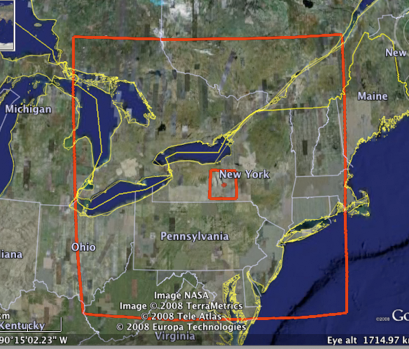
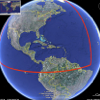
I like the squares for a few reasons -- one is that it follows on the inspiration of the original Eames film, which is also a website (on 10/10/10 http://powersof10.com/ unveiled their substantially revised website, which includes the original film).
Using the squares also highlights some of the problems with flat maps of our round Earth and that's a teaching opportunity. When you try to draw that last square, which you really can't draw in any accurate way on the Earth, it brings attention (or can be used to bring attention) to the problems of any flat map, and that those problems get bigger as you map bigger and bigger areas.
The third and final issue for me is working with easier numbers when thinking about scale and helping students to understand what numbers like a million, a billion and a trillion really mean. Most people have no clue about that, and I think this is one way to attack that problem. To demonstrate the nature of this particular problem, I like an approach I learned from John Allen Paulos's book Innumeracy. He asked his students (or whatever audience he was working with) to mark on the long chalk board in the front of his classroom where a hundred, a thousand, a million, and a billion are if the two ends of the board are zero and a trillion. Very, very few people squeeze everything into the section of the board that is one one thousandth of the board's length.
A fourth reason for the squares is to push folks beyond the easiest stuff to do, so that they wrestle a bit with the software and hopefully learn a few things in the process.
But, like I said, you've got good reason for preferring circles, so that's fine with me.
Q6: My tour is almost done. Just can't find a tutorial that explains how to bring the google maps stuff into google earth. hmm... tried copy and pasting, importing links etc. See also Q7.
A: To get the stuff from Maps to Earth, if you don't see the Google Earth link, your window probably looks like this at the top:
Click on the 'Edit' button and it will look like this:
Click on "View in Google Earth" and it should download the map into Google Earth.
Q7: The tutorials use both Google Maps and Google Earth. I don’t see the advantage of using Google Maps. Can you explain?
A: I have updated the tutorials and removed most of the Google Maps references. The use of Google Maps in these tutorials is mostly a holdover from when certain things (like embedding photos) was easier to do in Google Maps than it was in Google Earth. Newer versions of Google Earth have made it simpler to do those things. Google Maps does offer an important advantage over Google Earth for certain contexts, though. It’s easy to collaborate with partners using Google Maps. Multiple people can work on the same file without needing to send files back and forth.
Uploaded pictures to Picasa Web Albums that are geotagged (marked with their location) can be viewed on a map within the Picasa Web Album. That’s really a Google Map. It can be downloaded to Google Earth. Doing this makes the icon for each photo a little tiny thumbnail of that photo. That can be helpful for doing certain things.
Q8: I completed the Powers of 10 video and emailed it to myself to see if it worked. I opened it in a different laptop (the one I'm taking to Wisconsin) and it didn't have any of the boxes or bubbles with the text.
A: The short answer is that you probably only had a single item highlighted, rather than a folder with all the boxes and bubbles.
Here’s the longer answer: If you’re emailing more than a single placemark or other item, the collection of stuff needs to be in a folder, or you need to select them one by one and mail them as individual attachments. The folder makes it simpler. To create a folder and load it with the things you want to send, do this:
Select the location where you’d like the new folder to go by highlighting it. If you forget to highlight where you want it to go, it will end up inside whatever folder you may have highlighted. You might choose ‘My Places,’ ‘Temporary Places,’ or make a folder to hold all your folders within your ‘My Places’ folder and call it ‘ReaL VFEs,’ for example.
Go to the ‘Add’ menu and select ‘Folder,‘and follow the directions. Give it a name. If it’s a Powers of Ten focused on your school, then use the school name and ‘Powers of Ten’ in the title. Add a description if you’d like. It might be nice to include your name as author in the description. Click ‘OK’ when done.
Drag the boxes and other pieces of your Powers of Ten into the newly created folder.
Drag the contents into a logical order. This will allow you to ‘play’ your Powers of Ten in a movie-like way.
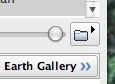
After you’ve got the contents in the folder and in the appropriate order, play it to see how it looks. To do that, highlight the folder and click the button that has a small folder icon with a triangle above it. This is between the bottom of the ‘Places’ window and the ‘Layers’ window and it looks like this:
You can change how long the pause is at each feature and whether or not the balloons are opened at each stop by changing your Google Earth settings. You’ll find that in ‘Preferences’ menu on the Mac and in the ‘Tools’ and ‘Options’ choices on the PC. Then click the ‘Touring’ tab (on either Mac or PC) and explore the settings.
When the tour is playing, a control bar will also appear in the bottom left of the map window. You can use this to pause, backup and restart your tour while it’s playing.
When you’re done, click the x on the control bar to make it go away or you won’t be able to do much else.
Q9: Google Earth was updated in late 2011, allowing for simpler use of pictures from sources other than photo sharing sites like Picassa or Flickr. How does that change making my own Powers of Ten?
A: It makes it simpler to embed pictures. An update for the tutorials was done in May of 2012 that includes this.
Make Your Own Powers of Ten Tutorial Videos:
The tutorial videos are linked from the “How tos” section of virtualfieldwork.org and available here.